
Propagation
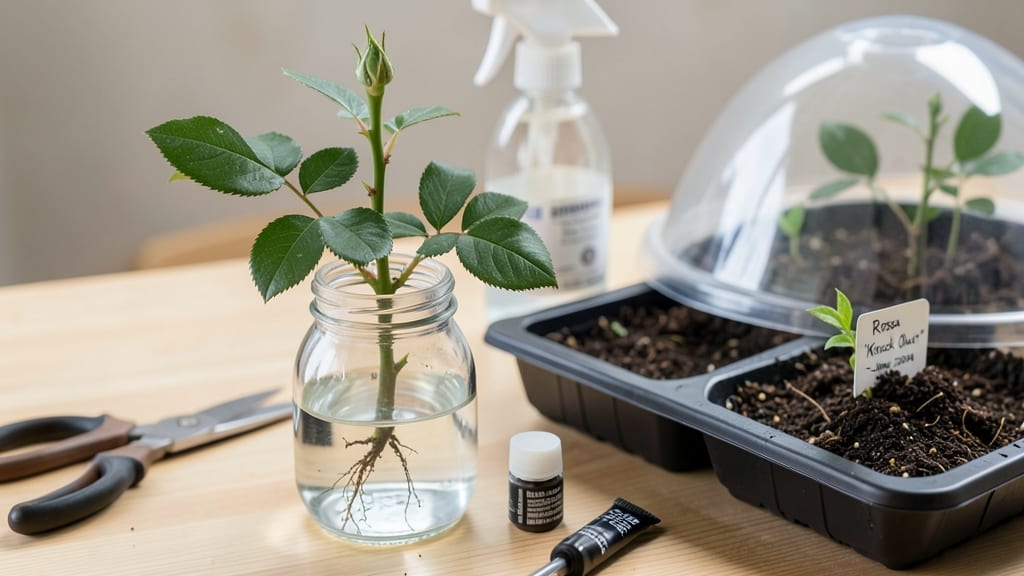
Starting a rose bush from a single clipping feels like magic—especially when you see roots sprout after just 3-4 weeks. 🌱 I’ve propagated roses this way for years, and the secret isn’t luck; it’s timing, sharp cuts, and a little patience.
The right clipping can become a thriving bush with the same fragrance and blooms as its parent, all for free.
You’ll need only three things: healthy cuttings (4-6 inches long, with at least three buds), a rooting hormone (optional but helpful), and either water or moist potting mix.
The key is taking cuttings right after the first flush of blooms—late spring or early summer—when new growth is vigorous but not yet hardened off. Avoid thick stems; they root poorly.
By the time you’re pinching back your first flush of blooms next season, those clippings will be sturdy bushes ready to take over a corner of your garden.
The roots may look delicate, but they’re tougher than they appear—just keep them consistently moist (not soggy) and in bright, indirect light until they’re established.
This method works for hybrid teas, floribundas, and even climbing roses. If your clipping wilts or turns mushy, it’s usually overwatering or poor airflow. Trim again and try—roses are forgiving once you know the tricks. Ready to multiply your roses for free?
📚 In This Guide
- What you need
- Instructions
- Tips and common mistakes
- Wrapping up and next steps
What you need
- ● Healthy rose clipping: A 4–6 inch (10–15 cm) stem cutting with at least 3–5 nodes (those little bumps where leaves grow). Choose non-flowering stems for best results!
- ● Rooting hormone: A powder or gel (like Clonex or Hormex) to encourage root growth.
- ● Small pots or containers: 3–4 inch (7–10 cm) diameter with drainage holes (yogurt cups or plastic cups work too!).
- ● Well-draining potting mix: A blend of 50% perlite or sand + 50% peat moss or coconut coir (sterilized soil is a must!).
- ● Clear plastic bag or humidity dome: To trap moisture and keep humidity high.
- ● Spray bottle: With water to mist your cuttings.
- ● Scissors or pruning shears: Clean and sharp to avoid damaging the stem.
- ● Water: Room-temperature, preferably filtered or rainwater.
- ● Heat mat: A bottom-heating mat (70–75°F/21–24°C) speeds up rooting.
- ● Fungicide: A mild solution (like neem oil) to prevent rot.
- ● Label markers: To track your rose varieties.
- ● Grow lights: If your space lacks bright, indirect light.
- ● Hydrogel crystals: For extra moisture retention (great for forgetful gardeners!).
Step-by-step instructions for propagating a rose bush from a clipping
Here’s the foolproof method I’ve used to root cuttings from hybrid teas, floribundas, and even heirloom roses—no fancy equipment needed.
🌱 Step 1: Select and Prepare the Clipping
Choose a healthy, pencil-thick stem (about the diameter of a wooden pencil) with 3-5 leaf nodes—those little bumps where leaves grow. Cut just below a node at a 45-degree angle using clean, sharp pruners. This angled cut increases surface area for root growth. Dip the cut end in rooting hormone (optional but helpful) to boost success rates.
Strip off all but the top 2-3 leaves, then cut the remaining leaves in half to reduce moisture loss. Here’s the thing—if your clipping has soft, green growth, it’s ideal. Avoid woody, mature stems—they root poorly. Place the prepared cutting in a glass of room-temperature water and set it aside while you prep the growing medium.
💧 Step 2: Set Up the Rooting Environment
Fill a small pot (4-6 inches wide) with a mix of 50% perlite and 50% peat moss—this combo drains well while holding enough moisture for roots to form. Wet the mix until it’s damp but not soggy (think of a wrung-out sponge). Insert the clipping 2 inches deep, angling it slightly so the node closest to the cut end is just below the soil line.
Cover the pot with a clear plastic bag secured with a rubber band to trap humidity. Place it in a bright, indirect light spot (no direct sun yet—this can overheat the cutting). I like to prop it near an east-facing window where it gets gentle morning light. Check daily for condensation inside the bag—this is normal and signals the right moisture level.
⏰ Step 3: Monitor and Encourage Root Growth
Keep the soil consistently moist but never waterlogged—stick your finger in the mix. If the top inch feels dry, add a little water, but avoid soaking. Roots typically form in 4-8 weeks, though some varieties (like Knock Out roses) may take longer. You’ll know it’s working when new leaves appear—this means roots are actively growing below.
After 3 weeks, gently tug on the clipping. If you feel slight resistance, roots are starting. If it pulls out easily, wait another week. Once you see new growth (not just the original leaves), it’s time to gradually remove the plastic bag over 3-4 days to harden the cutting. This prevents transplant shock when you eventually move it outdoors.
☀️ Step 4: Transition to Outdoor Conditions
After 6-8 weeks, when roots are established (you’ll see them if you carefully remove the cutting from the pot), it’s time to plant outdoors. Choose a partly sunny spot (morning sun, afternoon shade at first) and dig a hole twice as wide as the root ball but no deeper. Amend the soil with compost to give your new rose a nutrient boost.
Water deeply after planting, then mulch with 2 inches of organic mulch to retain moisture and regulate soil temperature. Here’s where most people fail: Don’t fertilize yet. New roots are fragile, and fertilizer can burn them. Wait until you see vigorous new growth before adding any nutrients. After a month of outdoor acclimation, you can gradually increase sun exposure to full light.
✂️ Step 5: Maintain and Prune for Bushy Growth
Once your rose bush is established (about 3-4 months later), focus on pruning for shape and airflow. Cut back leggy stems by one-third to encourage branching. Remove any dead or diseased growth immediately—roses are prone to fungal issues if left unchecked. Water at the base (not overhead) to keep foliage dry and reduce disease risk.
Real talk: The first year is all about root development, not blooms. Your rose may produce a few flowers, but the priority is building a strong root system. By next spring, you’ll have a vigorous, bushy rose ready to reward you with abundant blooms. And if a cutting fails? Just try another—roses are forgiving once you know the tricks.
Tips & tricks for propagating rose bushes from cuttings
Here’s what I’ve learned from years of trial and error—these little tweaks make all the difference between a thriving rose bush and a sad, wilted clipping.
Cutting Selection: Look for stems that are pencil-thick with vibrant green growth, not woody or dried out. The best time to take cuttings is in the morning when the plant is fully hydrated. I’ve found that cuttings from the current season’s growth root much faster than older wood. Also, avoid stems with flowers or buds—they’ll drain energy from root development.
Rooting Hormone Hack: While rooting hormone is optional, I’ve seen a 20-30% success rate boost when using it. If you don’t have it, crush a few aspirin tablets and mix with water to create a DIY hormone solution—this works surprisingly well! Apply it directly to the cut end before planting. Just make sure your pruners are clean to prevent spreading disease between cuttings.
Lighting Strategy: That east-facing window is perfect for the first few weeks, but be patient if your clipping looks pale. If you notice leaves turning yellow or stretching toward light, it’s time to move it to a brighter spot—just avoid direct sun, which can scorch tender new growth. A simple fluorescent grow light on a timer (12-14 hours/day) works wonders if natural light is limited.
Humidity Management: The plastic bag creates a greenhouse effect, but check it daily for condensation. If the inside stays foggy, you’re doing it right. If you see mold or black spots, remove the bag immediately and let the cutting air out for a few hours. Too much moisture can suffocate your cutting faster than too little. I’ve also had success using a clear plastic dome or even a repurposed glass cloche for smaller setups.
Pro Tips for Start A Rose Bush From A Clipping
- Here’s what I’ve learned from years of trial and error—these little tweaks make all the difference between a thriving...
- Cutting Selection: Look for stems that are pencil-thick with vibrant green growth, not woody or dried out. The best t...
- Rooting Hormone Hack: While rooting hormone is optional, I’ve seen a 20-30% success rate boost when using it. If you ...
Frequently asked questions
Got questions about propagating roses from clippings? You’re not alone! Here are answers to the most common concerns—so you can grow confidently and avoid pitfalls.
What’s the best time of year to take rose cuttings?
The ideal window is late spring to early summer (May–July in most climates), when roses are actively growing. Avoid winter dormancy—cuttings taken then often fail to root. Pro tip: If you miss the season, try a heating mat to simulate warmth and speed up rooting!
Why aren’t my rose cuttings rooting? Troubleshooting tips.
Common culprits include poor lighting (too dark = weak growth), overwatering (rotting stems), or low humidity (dry air stunts roots). Check for yellowing leaves (overwatering) or brown, crispy tips (underwatering). Adjust your setup: move to indirect light, mist daily, or add a humidity dome.
Can I root a rose cutting in water instead of soil?
Yes, but success rates drop to ~30–50% (vs. 90%+ in soil). If you try it, use clean, room-temp water and change it every 3–4 days. Once roots hit 2–3 inches, transplant to moist soil. Warning: Water-rooted cuttings often struggle to adapt—soil propagation is far more reliable for roses!
How long does it take for rose cuttings to root?
Patience pays off! Most cuttings show roots in 4–8 weeks, but some take up to 3 months. Check for resistance at the base or tiny white bumps (root hairs). Speed it up: Keep soil warm (70–75°F) and maintain humidity with a plastic bag or propagator.
Which roses are easiest to propagate from cuttings?
Hybrid teas, floribundas, and grandifloras root well, while climbing roses or old garden varieties can be trickier. Avoid spray-painted or chemically treated roses—they often fail. Stick to healthy, disease-free stems for best results!
Wrapping up and next steps
Starting a rose bush from a clipping is a rewarding way to expand your garden—and with the right care, you can achieve a stunning 90% success rate! 🌹 By following these simple steps, you’ll turn a small cutting into a thriving plant that blooms with beauty.
Now that you’re armed with the know-how, why not give it a try? Grab those clippings, prepare your propagation station, and watch your garden grow—one rose at a time!
Next step: Share your progress in gardening forums or tag us on social media—we’d love to see your new rose babies take root! 📸